In 9 to 12 months I will have a Shiitake mushroom, hopefully more than one. I expect our inoculated logs will grow more mushrooms that we can eat ourselves.
The downside is that I’ll have to wait for the spawn to colonize the logs in order for the logs to begin producing mushrooms. This process, called the spawn run, typically takes 9 to 12 months. In the meantime, a few of us will be analyzing recipes and dehydrating techniques.
If you didn’t know, Shiitake mushrooms grown in hardwood logs taste incredible. In fact, I am told that 95% of mushrooms we purchase at the grocery stores are grown indoors on sawdust blocks. If you happen to find log grown mushrooms at your farmer’s market, buy them. Enjoy what a mushroom is meant to taste like.
If you cannot locate mushrooms grown on a log, why not grow your own! It’s not a complicated process and one log can yield mushrooms for about five years. Getting started requires more work and effort, but afterwards the hands-on maintenance is limited.
For two weekends our family inoculated 48 logs as a group project. In summary, we plugged holes with spawn that contain mushroom mycelium. We had our red and white oak logs (ideal) and equipment ready before we began. It took 3 people with each assigned a different task. We completed the logs on two Saturday afternoons. Less resources and time are needed with only a couple of logs.
Ethan bought the spawn from Field and Forest Products. Their website and catalog contains detailed information and instructions for growing several types of mushrooms. The catalog is great and I suggest you get one. However, if you’re like me and want to know now, I’ve listed the basic steps that we followed. The steps work for 1 log or many. Try it, and let us know your results when your first mushroom arrives.
Basic steps for inoculating:
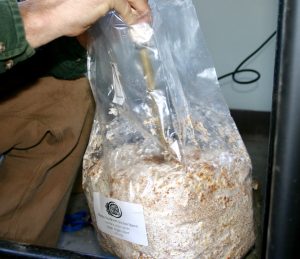
Spawn has Arrived
Our spawn arrived in 5+ pound bags of condensed sawdust. This sawdust was completely inoculated with mushroom mycelium. We kept the bags refrigerated until we were ready to use. It should last between 3 to 6 months but we suggest using as soon as possible.
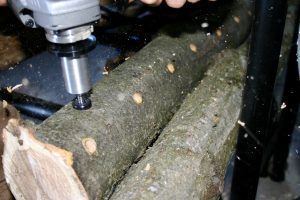
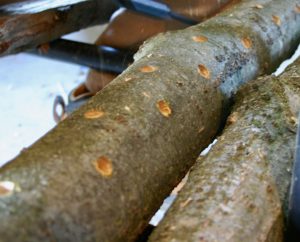
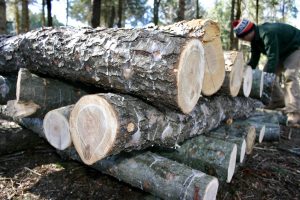
Logs and Drill Bits
We used 36 to 40 inch long red or white oak logs. The diameter of logs ranged between 3 to 8 inches. A modified angle grinder (available at Field and Forest Products) has a drill bit with a stop. This standardizes the depth and size of the hole. We highly recommend this drill bit, which will save you plenty of headaches.
We drilled holes 4 inches apart in each row, with each row being 2 inches away from the prior row. We also drilled our holes in a diagonal pattern. You need to have drilled holes in rows completely around the log.
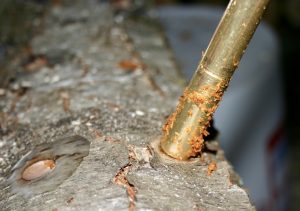
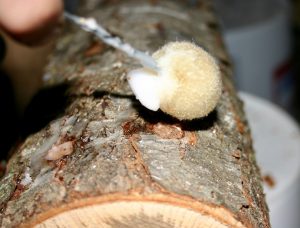
Inoculating Log with Spawn
Another helpful tool is a spring-loaded brass inoculator, which is also available at Field and Forest Products. This tool is extremely easy to use and quickly collects the right amount of spawn for each drilled hole. Make sure the holes are completely filled up as you insert the spawn with the inoculator tool.
After the drilled holes are filled with spawn, we sealed the top of each hole with cheese wax using a wax dauber. The wax seal keeps moisture in the spawn and log. This moisture is important because this is how the spawn spreads throughout the log. The wax will eventually wear off, but not to worry. There’s no need to wax again. Note: Cheese wax and daubers are available at Field and Forest Products.
Finished Log Set Up
After inoculating your logs you’ll need to place them in a shaded outdoor area for the resting stage. We did a crib stack placement. This is the preferred method of stacking logs.
You should consider watering your logs if you get a dry stretch during hot months. This watering keeps the logs cool and prevents moisture from leaving.
Check back to our blog for updates and next steps on our mushroom project.